Phishing Templates
Phishing templates are used to set up simulated scenarios that mimic real-world phishing attempts. These simulations aim to raise cybersecurity awareness among employees by launching realistic campaigns that imitate actual attacks.
This section includes tools to add new templates, edit existing ones, export or import templates, and categorize them by language, difficulty level, and content type.
Template Interface
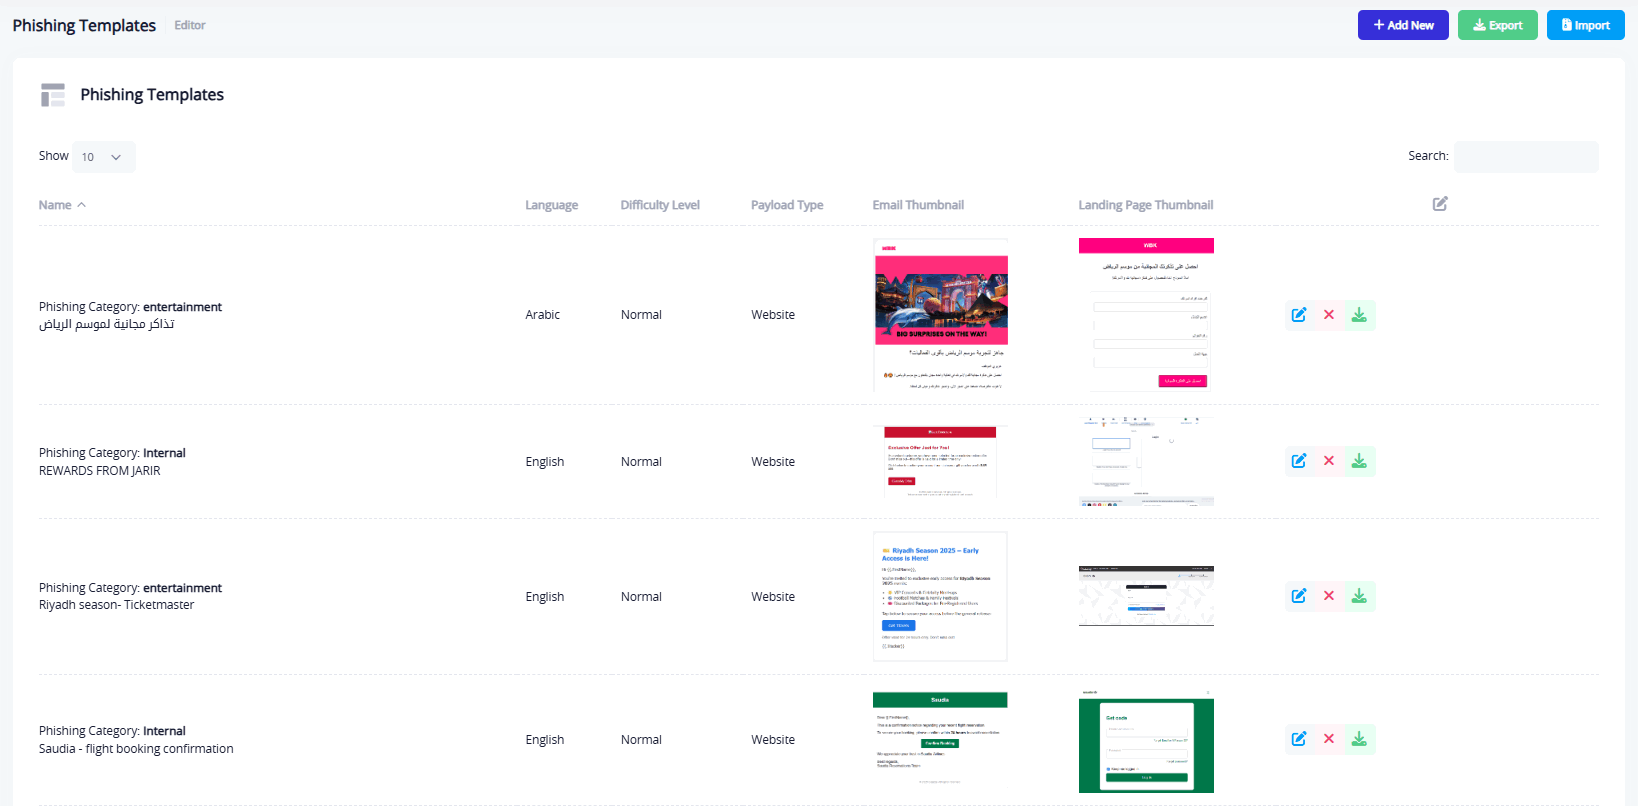
The interface displays a table listing all added templates, with detailed information for each:
- Name: The name used to identify the template within the system.
- Language: The language used in the email and landing page (Arabic / English).
- Difficulty Level: Indicates how complex the template is (Easy – Medium – Advanced).
- Content Type: Website phishing, malicious attachments, information request.
- Email Thumbnail: A preview of the phishing email layout.
- Landing Page Thumbnail: A preview of the fake landing page linked to the email.
- Template Options: Includes actions to edit, delete, or download the template (as a
.zipfile containing a thumbnail image of the template, landing page, and a.jsonfile with metadata).
Top Action Buttons
Three important buttons appear at the top of the phishing templates page:
- Add New: Create a new phishing template from scratch using a step-by-step builder.
- Export: Export all current templates in a
.zipfile. Each template is in its own folder containing:- A PNG image of the phishing email
- A PNG image of the landing page
- A
.jsonfile with the template's metadata
- Import: Import previously saved templates from a
.zipfile. The zip must follow this structure:- Each template must be in its own folder
- Each folder must include:
- A PNG image of the email
- A PNG image of the landing page
- A
.jsonfile with the template details
Create New Template
Clicking the "Add New" button opens a 4-step interface designed to guide the admin through the process of building a phishing template.
Step 1: Template Details
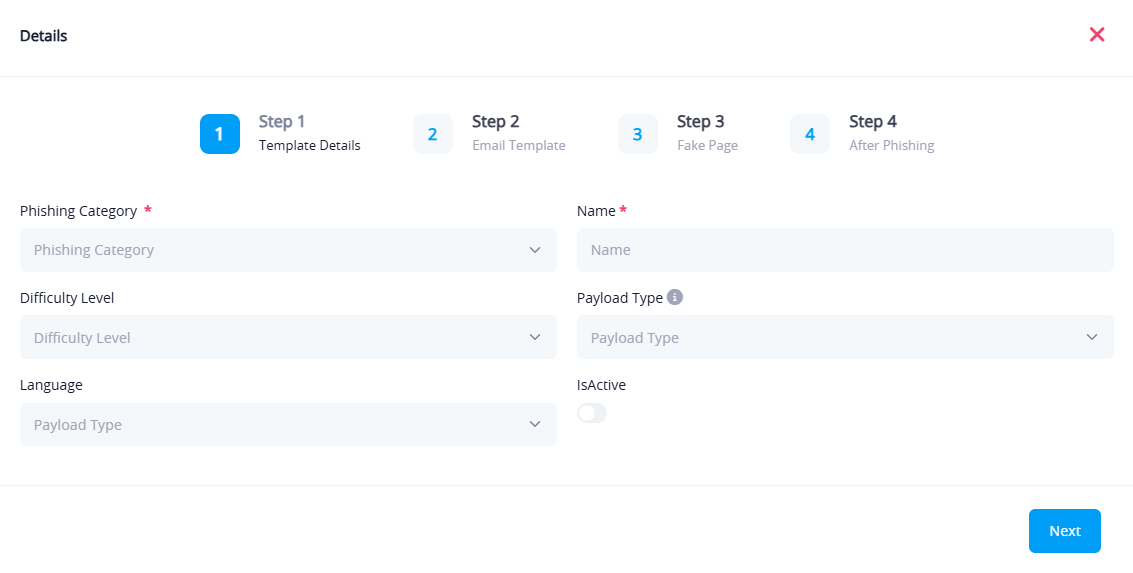
- Phishing Category: Defines the theme of the campaign, such as: Entertainment, Security, Discounts, Internal.
- Name: Internal name of the template (used in the template list).
- Difficulty Level: Indicates the complexity of the phishing scenario.
- Language: Choose the template's language.
- Payload Type: Choose one of the following:
- Website (most common)
- Attachments
- Information Request
- Active: Toggles the template to be available for use in campaigns.
Step 2: Phishing Email
In this step, the admin creates or selects the fraudulent email that will be sent to users targeted in the phishing campaign.
Purpose of the Step:
To simulate a convincing email that captures the user's attention and motivates interaction (e.g., clicking a link or downloading an attachment).
Fields and Content:
- Email Editor:
- WYSIWYG or HTML editor for designing the email layout.
- Supports logos, images, buttons, and custom text.
- Fake Landing Page URL:
- Inserted into a button or link within the email.
- Used to redirect the user to a spoofed landing page.
Notes:
- Content should be realistic and relevant to the context of the targeted employees.
- It's recommended to align email language and tone with the organization's culture.
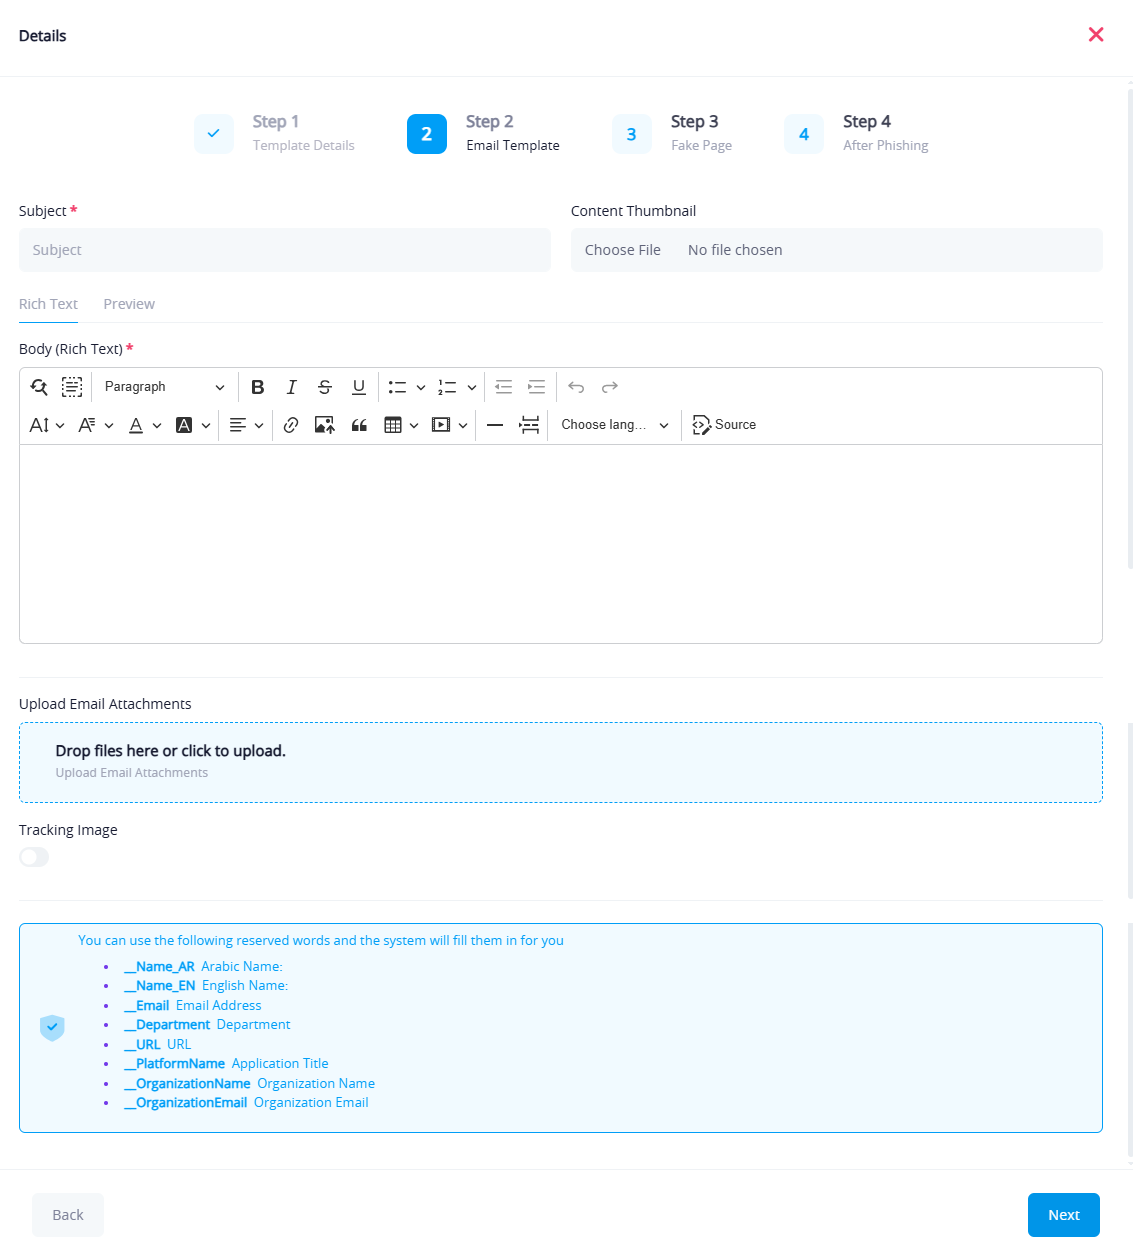
Available Dynamic Variables:
The email editor supports dynamic placeholders that will be automatically replaced with real values for each recipient when the campaign is executed. These help personalize the email for each user.
Supported Variables:
__Name_AR: User's full name in Arabic__Name_EN: User's full name in English__Email: User's email address__Department: User's department__URL: The phishing link used in the email__PlatformName: Name of the platform (e.g., "Rawam")__OrganizationName: Name of the organization using the platform__OrganizationEmail: Official email address of the organization
How to Use:
- Simply copy and paste the variable into the email content or subject.
- When the campaign is run, the system replaces each variable with the actual data for every targeted employee.
Step 3: Fake Page (Landing Page)
This is the spoofed web page that users are redirected to after interacting with the phishing email. Its goal is to simulate a trusted site in a convincing manner.
Purpose of the Step:
To monitor user interaction with the page—whether they enter data, click, or simply open it.
Landing Page Elements:
- Design similar to a real website:
- For example, a login page that resembles Microsoft or Google.
- Input Fields:
- Email, password, ID number, etc.
- Custom or Deceptive Messages:
- Designed to encourage interaction (e.g., "Your account has been temporarily suspended" or "Confirm your identity").
Available Fields in This Step:
- Upload Page File (typically in HTML format)
- Preview Page inside the platform
- Define internal links or messages shown on the fake page
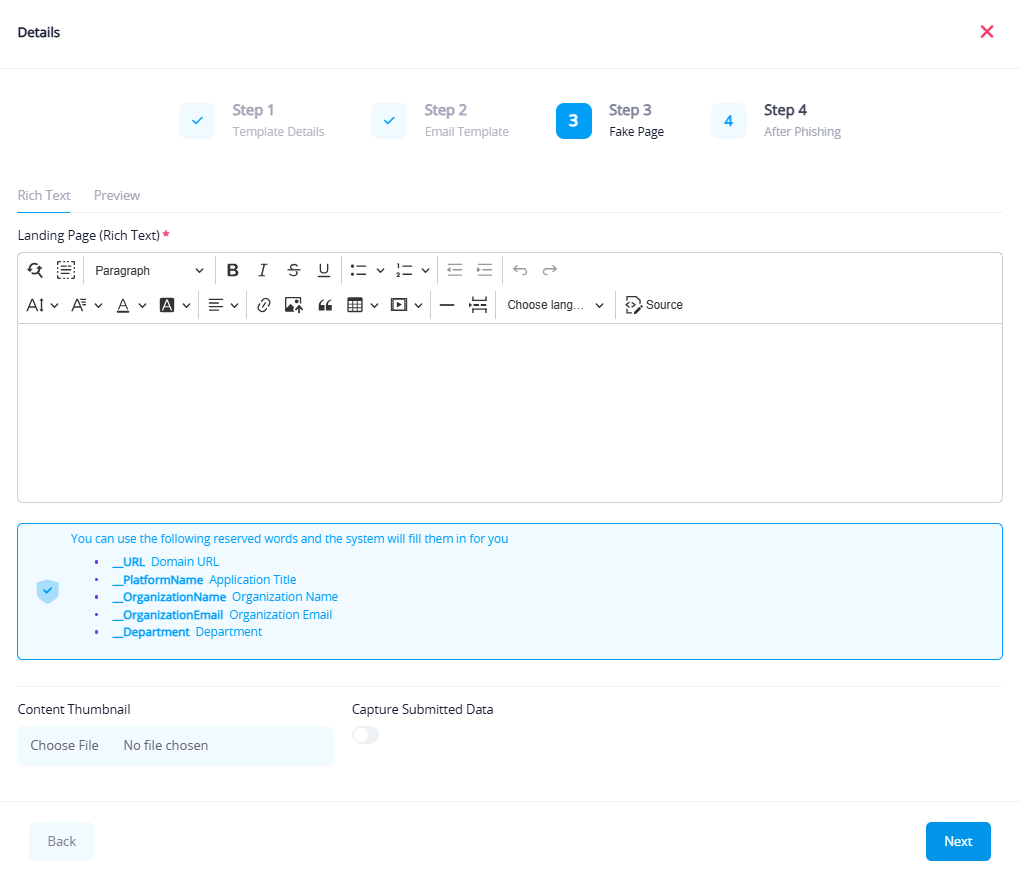
Using Variables in the Fake Page
You can also embed dynamic placeholders in the fake page to personalize content (e.g., greeting the user by name or pre-filling form fields).
Supported Variables:
__URL: The campaign link the user clicked__PlatformName: Name of the platform (e.g., Rawam)__OrganizationName: The name of the launching organization__OrganizationEmail: Organization's official email__Department: The department of the targeted user
Step 4: Post-Phishing Action
In this step, you define what happens after a user interacts with the phishing email or fake landing page—whether they enter their information or simply click the link.
Purpose of the Step:
To appropriately conclude the awareness scenario and display an educational message to the employee.
Available Options:
- Display an Awareness Message:
- Informs the user they have interacted with a simulated phishing attempt.
- Includes educational content and guidance on how to avoid real phishing threats.
- Redirect to an External Page:
- For example, a page on the National Cybersecurity Authority (NCA) website or an internal awareness guide.
- Take No Action (Silent Logging):
- Used in advanced scenarios to monitor behavior without user awareness.
Fields:
- Final Message Editor:
- Allows you to customize the educational message shown to the user.
- Supports HTML for formatting and design enhancements.
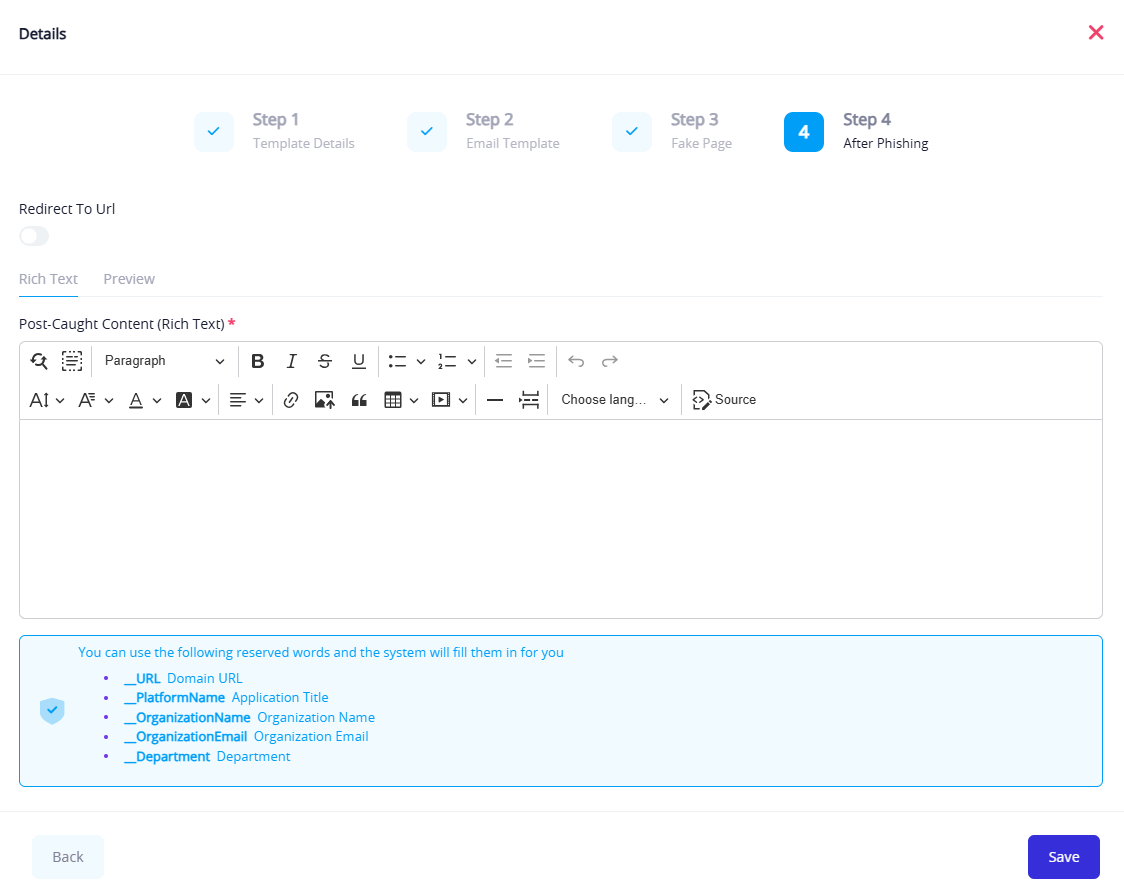
You can either design and customize a post-phishing page as shown above, or simply redirect the user to an existing web page by enabling the "Redirect to URL" option and entering the target link.